
If you’ve ever tried to plan a truck topper build that fits a family, two large dogs, camping gear, and a pair of e-bikes, then you already know the math doesn’t work. Something always gets sacrificed. Usually it’s bed space. Sometimes it’s sleeping capacity. Often it’s both.
We weren’t willing to give up any of it. So we used a $17 fork mount bolted to our dinette flip panel that does three jobs depending on which way it’s facing: holds a bike up off the floor, covers our fridge and power system, and disappears entirely when it’s time to convert the dinette into a full-size sleeping platform.
Here’s exactly how it works.
The Problem We Were Solving
Our Aterra topper on Beluga (our 2007 Toyota Tundra) already had a lot going on inside an 8-foot bed: a Lagun table dinette, a Dometic CFX5 35 fridge, a National Luna DC25 power pack, a Lion Energy UT1300 battery, and a second sleeping platform built into the center of the dinette’s U-shape. Add two Specialized Levo Gen4 ebikes and a couple of 75lb shepherds needing kennel space, and we were out of real estate fast.
Hitch-mounted bike racks solve part of the problem, but they leave expensive ebikes exposed to weather, theft, and road debris on every trip. We wanted the bikes inside the topper — protected, secure, and out of the way until we needed them.
The Core Idea: One Panel, Three Jobs
The dinette bench on the passenger side sits over a plywood floor that extends underneath it, holding the fridge and the power pack/battery setup. That gear needs to stay accessible, but it also needs to stay covered and out of a toddler’s reach during day-to-day use.
So we built a removable panel that sits on top of that storage area. That single panel does all the work:
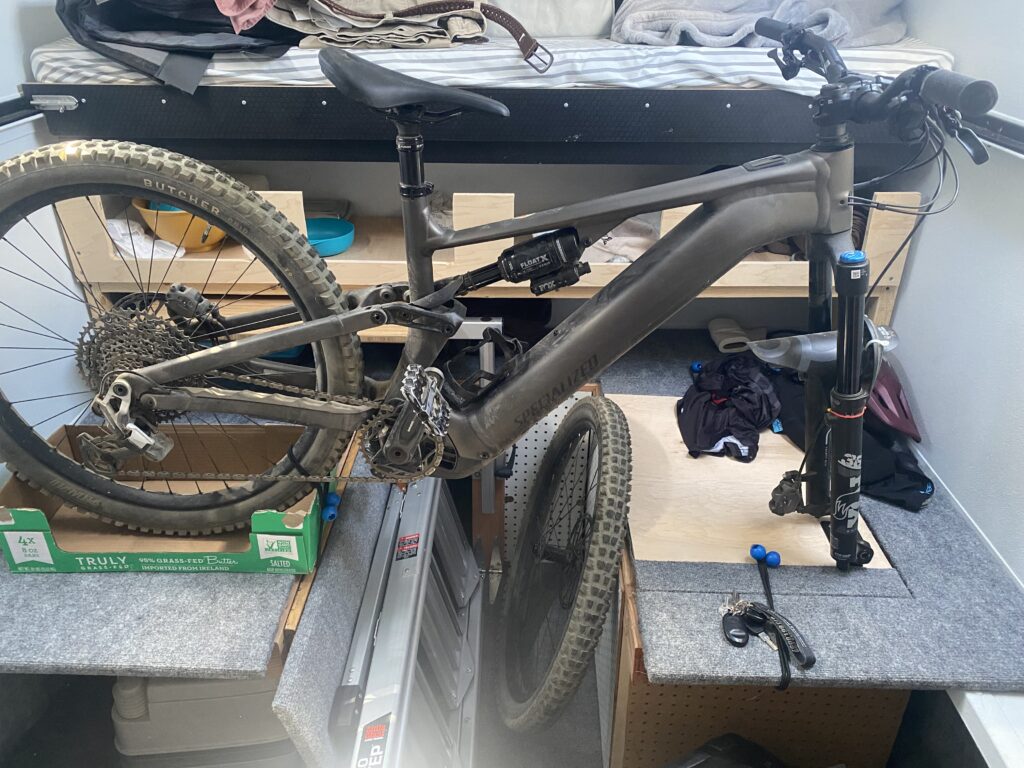
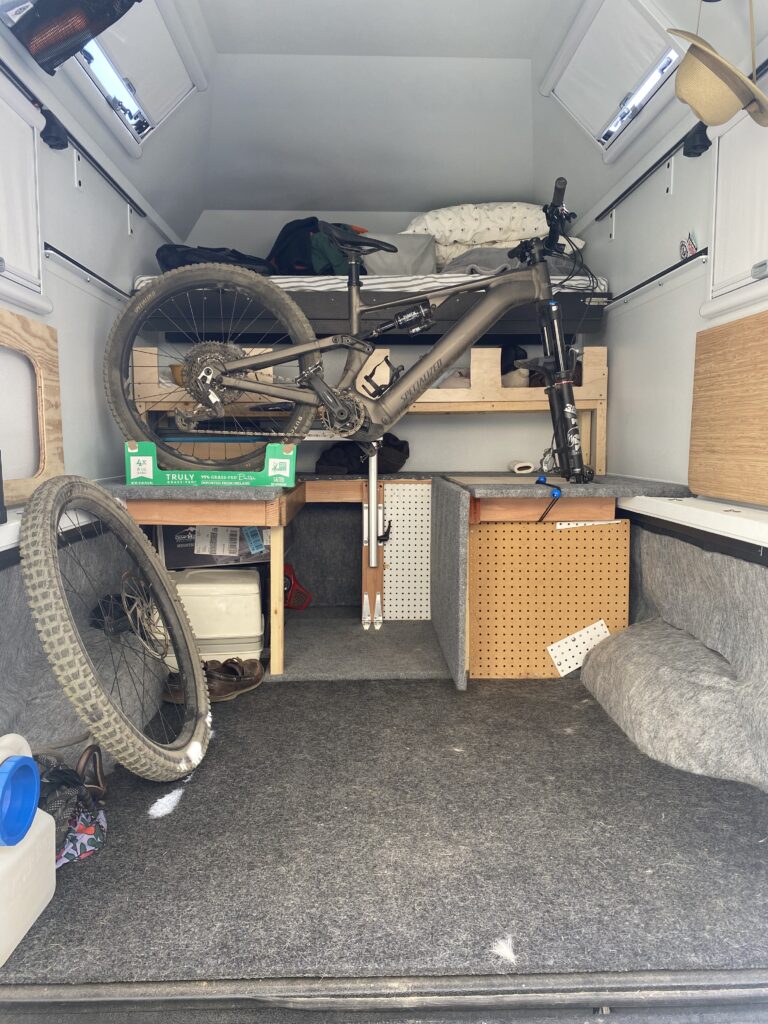
- Bike storage mode — A fork mount bolts directly to the panel. With the panel in place, an ebike’s fork locks into the mount and the bike stands vertically, wheel hanging free, completely out of the way of the floor space below.
- Fridge/power access mode — Lift the panel off entirely and you have full access to the CFX5 fridge, the DC25 power pack, and all the battery connections underneath.
- Sleeping mode — Flip the same panel over so the fork mount faces down into the storage box, hidden completely, and the flat side becomes part of the sleeping platform.
No separate panels to store, no extra hardware to dig out at camp. One piece of plywood, three functions, depending on which way it’s facing and whether it’s on or off.
The Fork Mount Itself
We used a Sunlite Bike Block fork mount, a $17–18 alloy thru-axle fork mount originally designed for roof racks and truck beds. It’s sized for a 15mm x 110mm boost thru-axle, which matches the Levo Gen4’s fork spacing.
It’s a simple piece of hardware: an alloy block with a slot that the thru-axle clamps into. On its own it’s meant to bolt straight to a 2×4 or a roof rack crossbar. We just bolted it to our plywood panel instead, in the right position to hold the bike upright and clear of the dinette structure around it.
A few notes if you’re considering the same approach:
- It’s not rated for ebike weight out of the box. Some reviewers of this exact mount have flagged concerns about using it with the added weight of an ebike versus a standard mountain bike. We’ve had good results, but we’d recommend checking your bolt-through points and torque carefully, and inspecting the mount periodically if you’re running heavier ebikes.
- You need the right thru-axle. The mount itself doesn’t include one — you’re using your bike’s own 110mm boost thru-axle to clamp into the block.
- Mounting position matters. We positioned ours so the bike clears the dinette bench, the wall, and the roof fan housing above. Measure your specific topper interior height and width before drilling.
Why This Beats the Alternatives
Hitch-mounted racks leave the bikes exposed and add length to the vehicle, which matters when you’re navigating tight forest roads or trailheads.
Roof racks add wind resistance, fuel economy loss, and the awkwardness of lifting a 50+ lb ebike overhead by yourself.
A dedicated bike garage in the build would have eaten bed space we needed for dog kennels and gear storage.
The flip panel gives us all the protection of internal storage without permanently sacrificing the space for anything else. When we don’t need the bike mounted, the same square footage becomes a fridge service hatch or a sleeping platform.
The Trade-Off, Honestly
This isn’t a five-minute swap. Flipping the panel from bike mode to sleeping mode means removing the bike, flipping a fairly heavy plywood panel, and resettling it into the frame correctly. It’s not something you’d want to do multiple times in a single day. In practice, we set up for the trip’s primary mode — bike storage for a riding trip, sleeping mode for when we know we’re not bringing bikes — rather than swapping back and forth constantly.
Building Your Own Version
If you’re working with a similar topper or truck camper setup and want to try this:
- Identify a flat storage surface that already covers equipment you need occasional access to
- Build or modify a panel that can be fully removed (for access) and flipped (to hide hardware on the underside)
- Mount a fork block — the Sunlite Bike Block is the one we used — in a position that clears your interior walls and ceiling height with the bike’s fork locked in
- Test the flip and removal process before you’re relying on it at a trailhead or campsite
- We used bungies to secure the panel during transportation, but in the future I plan to make a better latching system to hold the panel in place when holding the e-bikes.
It’s a simple, inexpensive solve to a problem that a lot of overland and truck camper builds struggle with — and it cost us less than $20 in hardware plus an afternoon with a drill.
Beluga is our 2007 Toyota Tundra Double Cab with an AT Overland Aterra topper, built out for four-season family camping, mountain biking, and fly fishing trips around the Sierra Nevada and Lake Tahoe basin. Follow the full build on Instagram @belugaventures.